Wednesday, October 12th, 2011
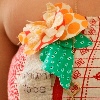
Casey of My Life as a Sugar Lander and Etsy shop Paper and Twine, created this gorgeous, sewing based baby shower, for her very lucky, mildly-sewing-obsessed sister Morgan! The details are so sweet and the overall look of the party is colourful, fresh and inviting.


With fabric streamers hanging from the balloons, mini Singers and old fabric spools decorating the tables, fabric flags in the cupcakes and handmade flag bunting, a fabric corsage for Morgan and some fabric birds that were later used to decorate the nursery, the shower has a delightful vintage-y feel. Head over to Casey’s blog for more awesome images of this party and lots, lots more!
 Verity
Tags: baby shower, balloons, bunting, corsage, cupcake flags, cupcakes, fabric streamers, party theme idea, sewing party
Posted in Parties | No Comments »
Wednesday, September 21st, 2011
For Beatrice’s birthday party, we created a number of paper decorations, which are very simple to make, cheap and most importantly, pretty! So I thought I would show you how to create your own. First of all, the circle garlands.
Delightful Disks
These are dead simple and can be altered in a number of ways to create very different effects. I used a 3 inch circle punch (you could just use scissors, but I would recommend a punch) and different pale shades of pink, peach, yellow, green, blue and purple. Work out how many you need to fill the area you intend to hang them and then set them out in piles of the correct number, in the colour order you want. Mine took 16 circles per strand and the shades were random within the colour.
Then you just sew! It really doesn’t matter how straight your sewing is (honestly, mine was all over the place!). Obviously, you want the beginning and end of the sewing on each circle to be vaguely central, but if you veer off course in between, it really doesn’t matter. Don’t forget to leave enough thread on at least one end of the strand so that you can use it to tie or stick them up.


This is one way to use these circle garlands. Debs used them not so long ago for a party she organised and this is how hers turned out. So you can see just how different they can be!
Simple Streamers
Next on the agenda is the zig-zag streamers. These are even easier than the circle garlands! All you need for these is a rectangle of paper and a pair of scissors. Cut a line parallel to the edge of the paper, about half an inch away, but don’t cut all the way through the paper. Then cut another line parallel to this one about an inch away, again not cutting all the way through. Continue cutting lines like this all along the rectangle. When you get to the end, turn the paper over and cut lines half way in between the cuts you’ve made, but again, don’t cut all the way through to the other side. Hey presto, a zig-zag streamer!


You will need to experiment slightly to see how big your rectangle needs to be in order to create the right length of zig-zag for your space, but this is another decoration that doesn’t require precision. If your cuts aren’t quite straight or evenly spaced, it actually doesn’t matter. (Am I coming across as a lazy DIYer yet?!)
Colourful Cones
And finally, this one isn’t really a decoration, it’s more a food accessory. It’s the paper cones which we used to hold our snacks. You need a circle big enough to draw around (that’s my bread bin lid in the picture), which will need to be around 30cm diameter, or you could use a compass if you have one. Then, lay greaseproof paper over the circle and free-hand draw a circle about 1cm smaller in radius to the coloured paper circle. You need to cut out twice as many coloured circles as you do greaseproof paper circles, as half of them will serve as bases. Then fold the paper circle in half and in half again to create a quarter circle. Cut out the 4 quarters and then repeat with the greaseproof paper. Roll up the quarter circles and stick into a cone shape with double-sided sticky tape. Take half of the coloured cones and cut off around 2cm from the top. Roll up the greaseproof paper circles and place them inside the other cones (there’s no need to stick these). Place a greaseproof paper-lined cone inside one of the bases and fill with snacks. Then eat. Easy peasy!


Verity
Tags: baby shower, birthday party, circle garland, paper garland, paper streamers, party decoration, snack cones, zig zag streamers
Posted in DIY, Parties | No Comments »
Friday, September 16th, 2011
So, for the first of my DIY tutorials on the back of Beatrice’s birthday party, I am going to show you how to make a lovely balloon wreath. This is a really simple and very effective decoration that can be adapted to suit pretty much any party theme. All you need to do is change the colours, pattern and balloon sizes and you can make a very different impact. Be warned however, that this is not a particularly cheap decoration despite it being one you can make yourself. I used 150 12” balloons, which cost me £25. You could use smaller balloons, which are cheaper per piece, but you would need more balloons, so I think the cost would work out to be similar. Then the wreath-shaped oasis (bought from my local florist) was £5. The only thing thrifty in this tutorial in fact are the pins. Florist pins (the type that would be used to make wreaths) were going to prove costly – at 10p per pin, so I scoured our local pound shop and found 200 kirby grips/bobby pins for £1 – bargain!

You need to use 1 pin for every 3 balloons to create a nice, full effect. Add each balloon individually, pulling it as far down the pin as possible before adding the next balloon, so they all end up squashed into the far end of the pin. Then, just push the pin into the oasis, as far as it will go.

Continue to add balloons to pins and pins to oasis all the way around the wreath, spreading them out so that some are pinned closer to the edge and some are more in the middle, to ensure good coverage. I also didn’t have all of the balloons facing the same way i.e. add one pointing up, one down and then one up, on some pins. Just to keep the random pattern of the wreath.

And there you have it! A lovely balloon wreath to behold! The best part? All of the balloons are reusable, so once you’re done with the wreath, you have 150 balloons to make your next party decoration with! (And a wreath shaped oasis to wrap in tissue paper and use to stand your cake pops in!) Maybe not so expensive afterall… :)
Verity

Tags: baby shower, balloons, birthday, childrens party, christening, kids party, multi-coloured, party, party decoration, rainbow, wreath
Posted in DIY | No Comments »