With writing a wedding blog as well as this baby blog, I’ve seen rather a lot of bunting over the past couple of years. It’s a trend I can’t imagine is ever going to go away as it’s always going to look adorable! With different fabrics, colours, shapes and so on, there are so many ways to make bunting work in baby’s room. Here are 5 ideas that are all using that classic triangle shape we all know and love…
1. Painted pennants
I love this rainbow of flags painted onto a wooden headboard. A DIY project that will become a feature of your little one’s bedroom.

Goodwins Custom Crafts
2. Cute quilt
For something a little bit different how about stringing your bunting along a crib quilt? Cute!

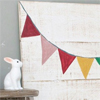
3. Bright bunting
Click the link below this one and you’ll be directed to an awesome, easy tutorial to recreate the look yourself. Simple, but looks fantastic.

Via ebabee
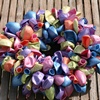
4. Cushion bunting
Whether you choose to buy a cushion such as this or have a go at DIYing a version, stitching across a cushion is a playful cute way to include bunting in baby’s room. The fabrics you choose can match with the duvet set and curtains too!

5. Ceiling strings
Bunting going across a room is a great way to add decoration to an otherwise undecorated room. Rather than paint a fancy mural or stick on a decal, bunting does the trick of adding colour. You could even go for several strings in varying patterns as in the room below…

Light Locations via The Design File
![]() Debs
Debs